I re-made: Brownies

2018-05-13_18-32-17_612.jpeg

This is the same recipe that I tried previously.  I did a few things differently:

  • I added 1 tsp of espresso powder.  Results: not a noticeable coffee flavor, but it’s possible it enriched the chocolate flavor.  Would try again, but increase amount.
  • Baked in a smaller pan with the goal of creating taller brownies.  Results: the edge pieces were tall, but the center pieces rose and then collapsed like a cake does.
  • Used an electric hand mixer instead of just manually stirring it on the stove.  Results: much less sore arm.

Overall: these are still really amazing brownies and I would again recommend this as a great recipe.

I made: Roll-out chocolate chip cookies

Just another quick mini-post today.  This is a good recipe for a crumbly, shortbread-like cookie that bakes well and isn’t overly fussy.  Because it does have chips in it, I would not recommend using an especially intricate cookie cutter for this particular recipe; however, it worked fine for the crescent moons, and I imagine would be similarly fine for circles, hearts, stars, snowmen, anything else that doesn’t have too many twists or turns.  They taste really good and are buttery and keep well for several days.

I made: Peanut butter cut-out cookies with chocolate ganache

This is a continuation of my search for good cookie-cutter cookie recipes.  The brownie roll-out cookies from last month were a good start, and I was feeling up for something a little more fancy last night!  So my dinosaur cookie cutters from Sur Le Table + this recipe were next on the list.

The cookie recipe is pretty straightforward:

  • Beat together 1/2 cup creamy peanut butter, 6 tbsp softened butter, 1/2 cup packed light brown sugar, 1/3 cup light corn syrup, and 1 large egg.
  • Add in 1 cup flour, 1.5 tsp baking powder, and 1/8 tsp salt.
  • Add in the last 1 cup flour.
  • Divide the dough in half and roll out between sheets of waxed paper.  Refrigerate the dough for 45 minutes.
  • Preheat the oven to 350 degrees and cut out cookies in desired shapes.  Reroll scraps and cut.
  • Bake for at least 9 minutes.  Let cool on sheets for 2 minutes, then remove to cool.

While cookies are cooling, prepare chocolate ganache:

  • Heat 1/2 cup heavy cream in microwave-safe bowl for 45 seconds.
  • Add 1 1/4 cups chocolate chips (which equals 7.75 ounces according to a converter I used, if you have bar chocolate instead of chips).  Stir for 1-2 minutes or so.
  • You might need to microwave again for 15 seconds or so.  The ganache should be creamy and smooth.  Let it sit for about 5 minutes then spoon/brush onto the cookies.
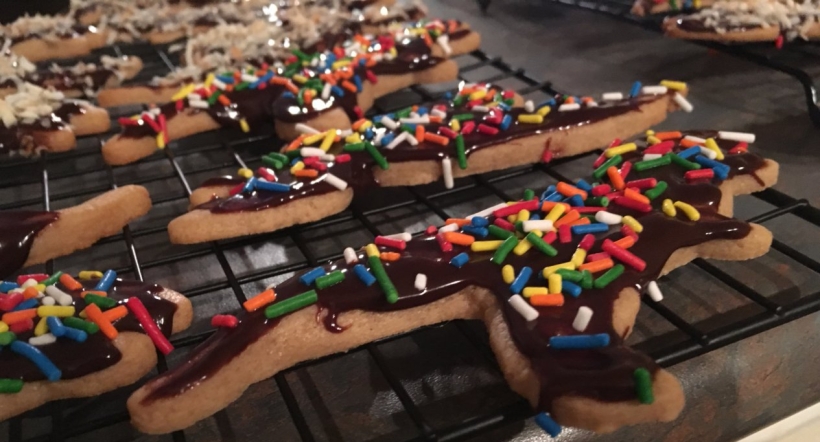
  • Top with sprinkles or whatever.

V9OtPgz1eeM8iFX2cVDMByPsGCFnhbfDhvMPCCQn00IpX92IB

OVERALL:

  • These cookies are good and taste good.
  • I didn’t have milk chocolate chips as suggested.  I used a mixture of milk and semisweet bar chocolate.  So it was a little more adult.  For dinosaur cookies.
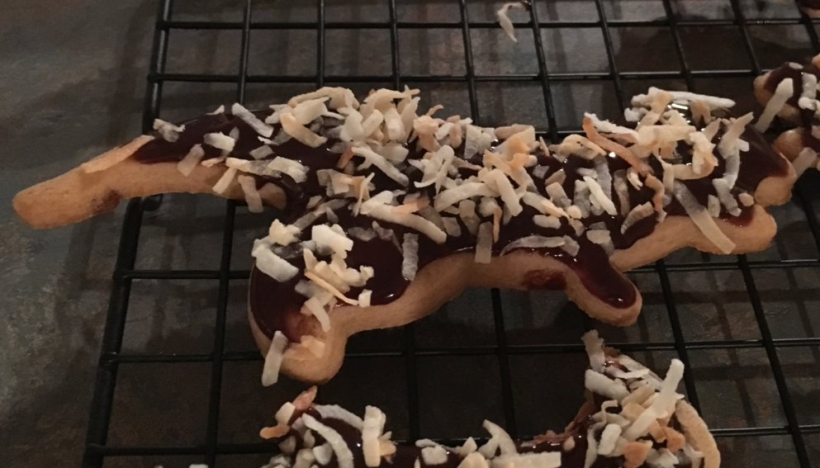
  • I had leftover toasted coconut from several months ago that I found in the freezer, so obviously I put those on some of the cookies.  They were even better than the plain sprinkles cookies.
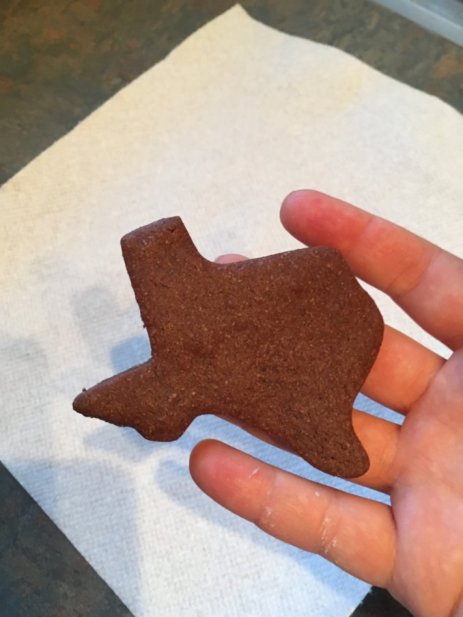
  • The dino cookie cutters are harder to use than the Texas-shaped ones.  I ended up working it out, but it required a slightly thicker cookie roll-out than I had been intending.
  • Also, this recipe says to refrigerate for 45 minutes but that is DUMB.  This dough needs to be refrigerated for at least 2 hours and probably overnight would be better.  I kept having to put it back into the fridge and it was leaving butter grease everywhere.  Much more of a pain than it needed to be.
  • I turned down the oven to 325 and baked for 10 minutes instead of 9 minutes at 350 because I was afraid of overly crisping up the dinosaur tail and feet.  This worked fine.

NEXT TIME:

  • Mainly the refrigerating thing.
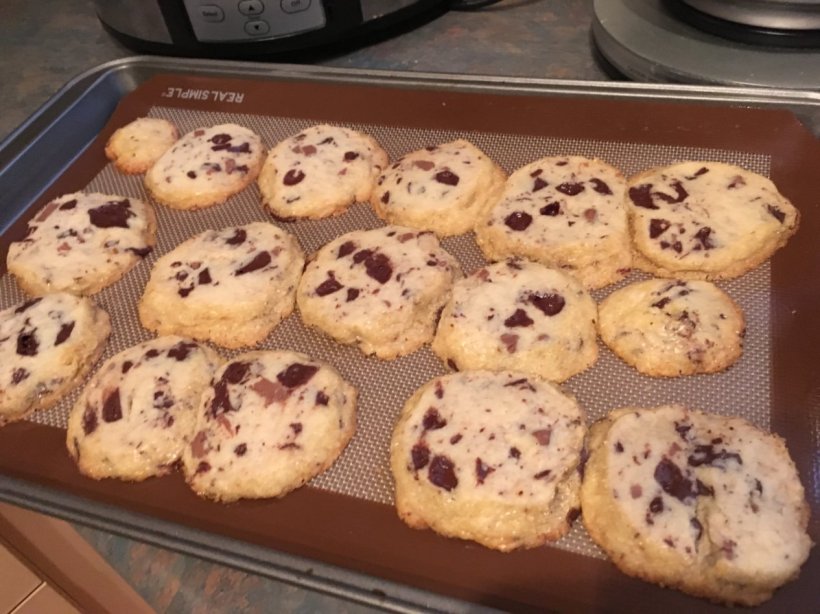
  • Okay also.  I’m not gonna lie, the dino cookies are cute.  But at the end, I got tired of rerolling and cutting them, so I just made five ball-shaped cookies and baked them for 15 minutes.  They were WAY BETTER than the rolled out ones tbh.  I didn’t even get a picture because my husband and I ate them all first.

D1iiF5GyUN-INe173k-TuUCxL1oQoQsYWD7teDcqVQApX92IB

In conclusion, these are good roll-out cookies and a definite addition to the repertoire.  I’m still messy at decorating with ganache, that’s something to work on for sure!

I made: Chili chocolate cupcakes!

One of the best things about posting pictures of stuff you bake on social media is that on your birthday, people give you cookbooks!  I basically doubled my cookbook library last month (it was not large to begin with haha).  Anyway, one of the books was a cupcake specific cookbook.  It has lots of fun ideas in it and this chili chocolate concept seemed promising.

I don’t have the recipe on me right now, but basically it was a simple chocolate cake recipe with added chili powder and cayenne pepper.  Then the frosting recipe was a chocolate buttercream with cinnamon.  (I’ll try and update with full details when I get back home to the cookbook.)

OVERALL:

  • My husband and father in law REALLY loved these.  I was unsure how I felt about them at first, but by the second day I decided I also liked them a lot.
  • Kudos to my husband for the idea of sprinkling with red sugar.
  • They make a really dense, almost brownie-like cake.
  • Either I’m getting better at judging how much batter to pour, or these cupcakes just don’t rise as much as others (maybe both).  I didn’t have the messy problem that I often have with cupcakes overflowing during the bake.
  • Check out that crackle.

594RiBm4RFDM-yzSlbMGg4ISMjxnz0VPvodEQrX2PDApX92IB

NEXT TIME:

  • Make a little bit more frosting than recommended, or don’t be quite so generous – I ran out of frosting and had to leave three cupcakes naked.
  • Try mini cupcakes maybe?
  • Honestly this was a really solid recipe, doesn’t need a ton of tweaks.

ODNa-Aq-qVN2TRmdxBckUAo89huZkmeLBrZRlQIBT2gpX92IB

I made: Brownie roll-out cookies!

Just a mini-update today as I don’t have time to do a full write-up but I do want to record these before I forget.  The motivation for this bake was because we went to Sur Le Table over the weekend and got a bunch of amazing cookie cutters, so I needed to work on my cookie-cutter-cookie recipes.  I got this one from Smitten Kitchen and it is pretty great!

Notes:

  • The recipe itself is perfect and doesn’t need adjusting.
  • These are VERY easy to cut out, even with a fairly intricate cutter.
  • I accidentally froze the dough because I forgot about it and left it overnight, but I just rolled it out the next day and it was still fine.
  • The cookies taste AMAZING fresh out of the oven and are soft and lovely.  They harden up after 24 hours so I’d recommend eating them right away.

WqHiKGNIspB0M49lwIOzICC9Bj-w1cv75B6XnE6hGI4pX92IB

I made: Shortbread chocolate chunk cookies

These are the chocolate chip cookies you make if you want to impress a bunch of grown-ups and disappoint children.  They’re good–but they aren’t what you expect from a chocolate chip recipe.

This is another one of many Smitten Kitchen recipes I’ve saved, which is a resource that so far hasn’t done me wrong!  It’s pretty simple and straightforward.  I chose these cookies because they do best with a two-day process, and I’m trying to explore more recipes like this, so I can bake on weekday evenings without messing up my sleep hygiene.

Day 1: Make & freeze the dough

  • Mix 1 cup plus 2 tbsp softened butter, 1/2 cup granulated sugar, 1/4 cup light brown sugar, and 1 tsp vanilla extract until light and fluffy.  (The recipe calls for salted butter, which I don’t have, so I added 3/4 tsp kosher salt instead.)
  • Add 2 1/4 cups flour and mix until just combined.
  • Add 6 ounces chopped semi- or bittersweet dark chocolate, mix until just combined.
  • Divide dough into 2 parts and shape into logs about 2 inches in diameter, wrap with plastic wrap, and freeze.

Day 2: Bake

  • Preheat oven to 350F and line 2 baking sheets with parchment paper.
  • Lightly beat 1 egg.  Take out 1 cookie log, brush with egg, and roll in turbinado sugar.
  • Cut the log into 1/2-inch-thick rounds using a serrated knife (be careful for chocolate chunks).
  • Arrange onto baking sheet and sprinkle with salt.
  • Bake 12-15 minutes, let cool slightly, then transfer to wire racks.

vZxChodhpn-52ez_DoaTS1CnHz3TLLBUjCe11ErWsgcpX92IB

OVERALL:

  • Like I said, these taste good, sort of strong and chocolatey and salty.  They are very shortbready in texture, so they’re a tiny bit of a pain to cut, but not too bad.  I discovered that simply pressing the knife down, instead of sawing back and forth, was a better method to keep the cookies intact.
  • I also made a dumb mistake!  I saw that the recipe called for 1 egg but I didn’t see that the egg was for brushing the sugar, so I just tossed it into the dough.  It didn’t really do any damage, although it probably made my version a little less shortbready than it would have been otherwise.
  • I didn’t have semisweet chocolate so I used 4 oz extra dark bittersweet chocolate + 2 oz milk chocolate.  It was actually really interesting this way!
  • I froze the logs overnight.  I think it would be fine to freeze for less time, or probably even longer.

NEXT TIME:

  • It would be nice to do the recipe right and not put an egg in it lol.
  • Also would want to try different combos of add-ins.  I kept thinking about toffee.

lZDAK1L7L6JKMEiEk6kjln2KECiMKmc-3c4GuwRlW0wpX92IB

I made: Butter cookies dipped in chocolate

I actually made these a week ago, I’m still catching up on this blog.  Since I only baked 2 things in February, I’m not going to do a month-in-review post.  These were pretty good cookies, although I think they were more about how they looked than how they tasted.

I really like looking at Smitten Kitchen for recipe ideas.  She has a nice variety and always has excellent pictures.  The other recipe of hers I’ve actually tried, Classic Brownies, was amazing.  These cookies were good too.  They were almost shortbread-like in flavor, although less crumbly.

Basic recipe:

  • Preheat oven to 350F and line baking sheets with parchment paper.
  • Combine 1 cup unsalted butter with 2/3 cup granulated sugar until well blended and light.  Add 2 large egg yolks, 1 tsp vanilla extract, 1/2 tsp almond extract and 1/2 tsp fine sea salt and combine.
  • Add 2 cups flour and mix just until flour disappears.
  • Fit a piping bag with a medium french star tip.  Pipe the dough about 1/2 inch wide, 2 inches long, spaced about 1 inch apart.  Bake cookies for 11-13 minutes or until golden.
  • Cool for at least 2 minutes and then remove to cooling rack.

Additions:

  • Melt 10 to 12 ounces of semisweet chocolate in the microwave or carefully on the stove.  Dip each cookie into the chocolate and place back on the baking sheets lined with parchment.
  • Spoon sprinkles over the chocolate.
  • Let cookies cool on at room temp or put into fridge/freezer to speed them along.
  • If you run out of sprinkles, you can use almonds, coconut, whatever!

1qyBlNi5reY3wS6nDIpT_dG_bjEpsiM__VeXU2M4BgkpX92IB

OVERALL:

  • I did a few things a little different from the recipe.  First of all, I didn’t want to make jam sandwich cookies, so I completely ignored that part.
  • Second, I added almond extract as suggested as a variation. I really liked it.  I would have added the suggested lemon zest too except I seem to have thrown away all my lemons.  😦
  • I used my yellow silicone re-usable piping bag for these cookies and I. HATED iT.  This cookie dough is too thick and the silicone was not agreeable with it.  My wrists and arms hurt from all the effort.
  • Overall I think these were good, serviceable workhorse cookies.  I don’t know if anybody would ever put them in their “favorites” list, but they were cute and simple, and people at home and at work seemed to like them.

NEXT TIME:

  • If I were going to do these again, I would try one of the plastic disposable piping bags instead of the silicone.  That was definitely the worst part.
  • I might try making them into jam sandwich cookies although I really don’t feel particularly compelled to.

xEZEZB7qeZozXR_mDsftOFAI138cMyre3Dq7vv1mT4kpX92IB

I made: Banana buttermilk muffins

You know the drill.  Buy bananas, fail to eat all bananas before they turn black, put bananas in freezer in hopes that someday you’ll be a person who makes banana muffins.  Well, I’m really happy to report that for the first time in my life, I am finally that person.

I used (more or less) this recipe but seriously guys, it’s banana muffins, there are approximately one million recipes and all of them are basically fine.

Steps:

  • Prep: preheat oven to 375 and spray/line muffin tins as you prefer.
  • Mix dry ingredients: 1 3/4 cups flour, 1/2 cup sugar, 2 tsp baking powder, 1 tsp baking soda.  (The recipe called for whole wheat flour, which I don’t typically have, so I used regular AP flour and it was fine.)  I also added 1/2 cup chopped walnuts at this time.
  • Mix wet ingredients: 1 cup buttermilk, 1 cup mashed bananas (2-3 bananas’ worth, depending on the size of your bananas), 2 tbsp canola oil, 1 egg, 1 tsp vanilla.  (This recipe called for low-fat buttermilk, which is stupid.  I use normal buttermilk like a normal person.)
  • Add wet to dry and mix until just blended, don’t overmix.
  • Add 1/4 cup mini chocolate chips and fold, don’t overmix.
  • Fill muffin cups.  Press more mini chocolate chips on top of the muffins if you want.
  • Bake 15-18 minutes.  Now I took mine out at 18 minutes and they were still not done (more below), but use your judgment.
  • Cool in pan for at least 10 minutes then remove to rack to finish cooling.

QWHwFnpEczbt1-cOmQFu8YDXaruJQX3gAbnbwuWgNLEpX92IB

OVERALL NOTES:

  • I am noticing a pattern in general that my oven does not tend to cook things within the times recommended.  If it does, it’s always the highest possible time.  I’m mystified because I really have checked various sections of my oven’s temperature with an oven thermometer.  It is possible that maybe one section of my oven doesn’t heat evenly and maybe I missed that section when I was checking.  It does seem like the back half of the muffins cooked okay, and it was mostly the front half that remained slightly underbaked.  Or maybe my oven thermometer is also wonky idk.
  • Another issue I’ve had AGAIN with muffins is that even though I followed the recipe almost exactly, I still had WAY too much muffin batter.  I don’t think this is explainable by the extra 1/2 cup walnuts.  I forgot to take a picture of it, but when I first took them out of the oven, it was basically a solid mass of muffin that had almost spilled over the sides of the pan entirely.  Is it possible that my muffin tin itself is weirdly non-standard?  Like, the cups are just a tiny bit too small?

wgaTf_tdlekxkoJ2UYnY9-rBnUoer482X5qRuHu_nHcpX92IB

  • Regardless, these tasted pretty good anyway so I’m not complaining.  I LOVE the combination of chocolate + banana.  Add some peanut butter and I’m in heaven.

NEXT TIME:

  • I would still make banana muffins to use up frozen bananas but I might like to try another version of the recipe just to see if different combinations are even better.  This recipe seemed slightly inspired to be “healthy” which is not a quality I’m particularly looking for in baking.
  • If repeating exactly, I would bake longer.
  • I’m going to try rotating things in my oven to see if that helps the uneven baking issue.
  • Maybe some peanut butter?

4VzmZg8YE7MHyeUHRCaOS3tIfbOXDwoynNSsGS0P7CopX92IB

Gooey slightly underbaked muffins.  Still ate them

I made: Brownies

Just a general reminder: this is not a recipe blog, but rather a place for me to record my baking efforts and personal thoughts and notes as I make things.  For easier reference guides, please check the original links I post.

I have a vague hope of getting through all the recipes I’ve saved in my “want to bake” folders.  One of the earliest was this classic brownie, adapted from a Cook’s Illustrated recipe.  I can’t remember the last time I made brownies from scratch, if I’ve ever even done so.  Brownie mixes are pretty straightforward, and usually yield good results.  So to go to the effort to make it in a fancy way, it better be worth it.

How to make:

  • Prep: preheat oven to 325.  Line 13×9 baking dish with aluminum foil and spray.
  • Toast 1 cup chopped nuts on a baking sheet in oven.  (I used 1/2 cup walnuts and 1/2 cup pecans.)
  • Combine dry ingredients: 1 1/4 cups cake flour, 1/2 tsp salt, 3/4 tsp baking powder.
  • Potentially tricky part: melt 12 tbsp (1 1/2 sticks) butter and 6 oz unsweetened chocolate, finely chopped, in a pan on the stove.  Hot take (lol): I know you’re supposed to use a “double boiler” in a stove chocolate situation.  However, I’ve always found that if you melt the butter first, chop chocolate finely, and keep the heat very very low, you can avoid the fussiness of a double boiler and just deal with the whole thing directly in a saucepan.  (Also, I didn’t have 6 oz of unsweetened chocolate, so I used about 3 oz of unsweetened and 3 oz of semisweet chips).
  • Once chocolate is completely smooth, remove from heat and add 2 1/4 cups sugar. (In theory I could have reduced the sugar, since I had semisweet chocolate… but I didn’t haha).
  • Add 4 eggs and 1 tbsp vanilla extract, whisk until thoroughly combined.
  • Add dry ingredients in 3 additions, folding until completely mixed.
  • Transfer batter to prepared pan and smooth.  Sprinkle nuts on top.
  • Bake for 30-35 minutes until toothpick comes out mostly clean.  (I ended up going for a full 40 minutes.)
  • Remove and cool for at least 2 hours before removing from pan.  (This seemed like a lot… I was able to remove with no observed ill effects after about an hour.)

o7EXyUeUdWrDvND3M89sVzGVILpSHol9Msn0X9Yjl0EpX92IB (1)

OVERALL NOTES:

  • These are some good brownies.  My husband, who is generally a snob about chocolate and pretends he doesn’t like it, ate three of these and pronounced them edible.
  • The most annoying part was that it took a little more elbow grease than I wanted to actually mix it all together.  My arm hurt.

NEXT TIME:

  • I would DEFINITELY make these again.  I am happily taking a box to my advisor as a thank-you present, and I’m pretty pumped about how much her kids are going to like them.
  • Probably would be just as good without the nuts, I might try that next time.
  • I need to bust out my hand mixer.  I’ve gotten very dependent on the stand mixer, which is generally preferable.  However, for this particular recipe, given the amount of mixing in a saucepan on the stove, the electric hand mixer would have been perfect.

r3FjC8E5N6tO1A0YCMew_5g4U00Ym1Dqo347I-iic6spX92IB

Jealous background doggy

I made: Double chocolate chip muffins

I made these on Monday evening on a whim.  My main goal was to bake something fairly simple, for which I already had all the ingredients.  I almost chose a triple-chocolate recipe but it involved melting stuff, which was trickier than I felt up to.

Just a reminder that this is not, in fact, a recipe blog.  You can find a really good recipe for double chocolate chip muffins here:

Muffins are pretty easy most of the time.  Here’s how they went:

  • Prep muffin tin with liners and preheat oven to 400F.
  • Mix together dry ingredients:
    • 1 3/4 cups all-purpose flour
    • 2 tsp baking powder
    • 1/2 tsp baking soda
    • 2 tbsp cocoa powder (I used fairly heaping tablespoons)
    • 3/4 cup sugar (the recipe says “superfine” but I have no idea what that means so I used regular normal person sugar)
    • 3/4 cup chocolate chips (I used a mixture of finely chopped semisweet chunks left over from a previous recipt and chips)
  • Mix together wet ingredients.
    • 1 cup milk
    • 1/3 cup plus 2 tbsp vegetable oil
    • 1 egg
    • 1 tsp vanilla extract
  • Mix together dry and wet ingredients, leaving lumps.  Spoon into muffin cups and sprinkle some more chips on top.  (I used mini chips to sprinkle on top.)
  • Bake for 20 minutes or so.  (I don’t remember if I did slightly shorter or longer, sorry.)  Yields 12 muffins.

GNFiXwx9ZISEpYfpwrGXnHJwTXliinxH4HFOXpH1n9spX92IB

OVERALL NOTES:

  • This was one of the easiest recipes I’ve made since I started this whole baking project.  I didn’t even have to use the electric mixer.
  • These tasted REALLY good fresh out of the oven.  Warm, melty chocolate goodness.
  • I was a tiny bit worried I over-filled the cups, but they ended up perfect.  12 big, fluffy muffins with generous tops.

NEXT TIME:

  • I can’t think of anything I would do differently.  I would make these exactly the same.
  • Maybe double the recipe so MORE MUFFINS.